Blog

  • Quick Fixes For Call of Duty: Warzone Error Code 2048

    Quick Fixes For Call of Duty: Warzone Error Code 2048

    Don’t know what to do when the Call of Duty: Warzone error code 2048 pops up? Well, this article is all about solving this issue with three easy fixes.

    warzone error code 2048

    Why Do We Face the Error Code 2048?

    2020 released free-to-play battle royale Call of Duty: Warzone has seen several bugs already, one of which is the error code 2048. The most critical thing about the error is that the prime cause is still unknown. Many claim a recent update to be the reason behind the issue, while others consider server downtimes as the culprit. Whatever might be the reason, the good news is we have simple solutions to it.

    Related Posts:

    Guide for Fixing Dev Error 6034: Modern Warfare

    Guide for Fixing Valorant Error Code 39

    How to Fix Warzone Error Code 2048

    #Fix 1: Check if You Have the Latest Version of the Game

    update to fix warzone error code 2048

    The first thing you need to do to resolve the Call of Duty Warzone error code 2048 is to check if you are running the latest version of the game or not. 

    • Launch the game 
    • From the main menu, hover over to the update section.
    • Check for the availability of any updates. If available, download and install the same.
    • Once done, restart your device to make sure everything is fresh before launching the game.

    #Fix 2: Check if the Game Servers are Working Fine

    server check

    Most of the time, the games that operate online face multiple issues because of server failures. Suppose the error code 2048 isn’t resolved even after updating your game to the latest version. In that case, the next thing you can do is check for the game server status.

    For doing this, you can visit websites like Downdectector. On visiting those websites, if you come across any issue, wait for some moment until the game developers resolve the same. However, if the 2048 error code continues to bother you, try the next fix.

    #Fix 3: Reinstalling the Game

    install game

    If neither updating the game to the latest version nor checking for server issues helped you resolve the error code 2048, the ultimate fix you are left with is reinstalling the game entirely.

    For PC:

    • Head over to the control panel
    • Find and click Uninstall a program
    • Search for Warzone and click on that
    • Follow along the process until the game gets removed
    • Restart your PC
    • Launch Battle.Net
    • Log In to your Account using the required credentials
    • From the main menu, find Call of Duty: Warzone
    • Click Install
    • Once done, restart your device to be on the safer side.

    For PS4

    • From your PlayStation dashboard, hover to the library section
    • Under the Games section, find and tap the Call of Duty: Modern Warfare.
    • After that, press the Options button and click Delete.
    • Once done, hit back to the Warzone game page in the Store menu to download and install the game.

    Note: Make sure to restart your console before launching the game.

    For Xbox:

    • From the main menu of your console, hover over to the game installs section
    • Find and uninstall Warzone
    • Launch Battle.net 
    • Log in to your Blizzard Account using the required credentials.
    • Find and select Call of Duty: Modern Warfare.
    • Click the Install button to download and install the game.
    • Once done, restart your device, launch the game and look if the error is resolved.

    Final Words

    Although the prime reason behind the issue is still unknown, we expect the game developers to come up with an update for resolving the error real soon. Until then, these fixes are there to make sure you have an uninterrupted gaming session throughout.

  • How to Fix the Xbox 0x803f9006 Error

    How to Fix the Xbox 0x803f9006 Error

    Are you having trouble playing games because of the Xbox 0x803f9006 error? Here is everything you can do to fix the 0x803f9006 error code.

    Xbox 0x803f9006 fix

    Why does the Xbox 0x803f9006 Error Code Appear?

    The players from all over the world face the 0x803f9006 error on their Xbox in a few situations. While the issue primarily shows up due to sharing of accounts, sometimes problem-related to the servers may also result in the 0x803f9006 error. Another reason that might lead up to the issue is when you try to play a game purchased for PC on your Xbox and vice versa.

    Whatever may be the reason, having appropriate solutions is crucial. Thankfully, there are easy fixes to resolve the Xbox error code 0x803f9006.

    Related Posts

    How to Fix Xbox 0x803f9006 Error Code

    #Fix 1: Sign In to Your Account

    Xbox sign in

    • Click your Xbox “Home Button”
    • Head over to “Accounts” 
    • Find and tap the “Sign Out” option
    • Once done, Sign In back to your account using the login credentials.

    #Fix 2: Checking Xbox Server Status

    Xbox Server Status

    Sometimes the error code 0x803f9006 can also appear when Xbox servers are facing downtime issues. So, whenever you face the problem, make sure to look at the current status of Xbox Servers

    If you notice any issue regarding the server, wait for some moment until Microsoft fixes it. Once it happens, try playing your game and check if the issue got resolved.

    `

    #Fix 3: Setting your Xbox console and the Home Xbox

    my home Xbox

    • Click the “Home Button” on your controller.
    • Head over to the “Accounts” section
    • Find and tap “Add or Switch Accounts.”
    • Scroll down to your friends’ account that you are sharing your game with
    • Under that account, click on the “Settings” and then select the “Personalization” option.
    • The next thing you need to do is click on “My Home Xbox” and make sure to choose “Make this my home Xbox.”
    • Finally, ask your friend to do exactly the same with your account on his/her console.

    #Fix 4: Clearing the locally saved game caches

    clear cache xbox

    • From your Xbox dashboard, hover over to the settings and tap System.
    • Find and click the “Storage Tab” option and select “Clear Local Saved Games.”
    • Once the process gets complete, your console will restart automatically; wait until it happens.
    • After your console reboots, launch the game and check if the issue got resolved.

    #Fix 5: Perform a Power Cycle

    xbox power cycle

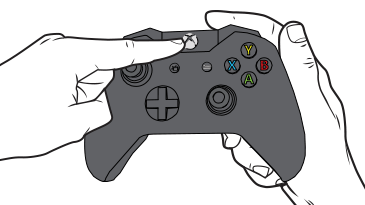
    • Press and hold the Xbox button until your console shuts down completely
    • After that, unplug the console’s power cable and wait for 10 to 15 seconds before plugging it back in
    • Turn on your console by pressing the Xbox button

    Final Words

    The Xbox 0x803f9006 error can really bother users; the good thing though the solutions are pretty straightforward. While restarting your device and logging yourself in and out of the game are among the common fixes, sometimes you might need to wait a while if the issue appears because of the server failure from Microsoft’s end.

  • Kik Keeps Saying Connecting: Fix Your Instant Messaging App

    If Kik keeps saying connecting, the main reason is due to an unstable internet connection. Due to the instant messaging service being an online app, it needs to continuously have a good network.

    An outdated Kik app or incorrect device settings are two other reasons why Kik will just keep saying connecting when you try and launch the app, or use its features.

    A quick reboot of your device, or a reinstallation can help eradicate this problem on your device.

    We have created this simple directory to guide you on why Kik keeps saying connecting, and what steps you can take to fix this error so you can get back to instant messaging, and meeting new people with the same interests as you.

    What is Kik used for?

    Kik keeps saying connecting
    Kik keeps saying connecting

    Kik is a free instant messaging app available to Android and Apple devices. The online service allows you to send direct messages or create group chats. Kik is just like WhatsApp or iMessage where you have access to different forms of media messages.

    What’s different with Kik, is that you can access public chats where you can speak to people you do not know. Open groups are available to connect people with similar interests through the instant messaging service.

    You can sign up for this chat platform with your email address and a password of your choice.

    Just like every other instant messaging service, it works over mobile data or a Wifi network. Because of this, users’ experience Kik keeps saying connecting.

    Why is my Kik stuck on connecting?

    Kik keeps saying connecting
    Kik keeps saying connecting

    Kik keeps saying connecting when it has not established a stable network to operate on. The online app needs to be connected to either a strong Wifi connection or adequate mobile data. If your internet is too slow for Kik to operate on your device, it will keep saying connecting.

    Other reasons why this issue will occur include;

    1. Date and time are incorrect

    Sometimes, if the date and time on your device are incorrect, it can interfere with the Kik connection to the server.

    The difference in information from both sides (your device and the server) will cause conflict when the app on your device attempts to process your request.

    2. Corrupted Kik file

    If the app’s file on your mobile device contains corrupt software, Kik may keep saying connecting because the contaminated software is blocking the program from working.

    If Kik was interrupted during a software update, this could be the reason for a corrupt file to be installed onto your device.

    3. Faulty Kik cache files

    Every time you open Kik on your device, cache files will store on your device. When these become too full or end up being faulty, it can cause the app to experience connection issues.

    4. Outdated app

    Depending on your device’s configuration, Kik should complete an automatic update when a new version of the app is released.

    If, however, there was a system glitch or you have not turned this setting on, an outdated Kik app can create performance issues.

    Related Posts:

    How to fix Kik stuck on connecting

    Kik keeps saying connecting
    Kik keeps saying connecting

    Refresh your internet connection to make sure your device can connect to the Kik server. You need to connect your app to a stable, strong network to stay online and for Kik to not get stuck on connecting. Restart your Wifi router by unplugging it for a few minutes.

    Once your device establishes a connection again, launch Kik and see it still keeps saying connecting. If it does, you can proceed with these additional methods;

    1. Check your date and time setting

    Check that the date and time on your device are correct. You may just need to refresh this information.

    Switch off ‘Set Automatically’ for a minute or two before you turn it back on.

    2. Reinstall the Kik app

    If the Kik app on your device contains corrupt data, you can uninstall and reinstall the program. This will get rid of contaminated files that can be the cause for Kik to keep saying connecting.

    After you uninstall Kik, restart your device before you reinstall it.

    3. Erase cache files

    It’s always good to clear out the accumulation of cache files on your device to free up space and get rid of any corrupt data.

    How to clear Kik cache on Android

    Settings > Manage Apps > Find Kik > Access Storage > Clear Data > Clear Cache

    How to clear Kik cache on iPhone

    You will need to uninstall your Kik app from your iPhone to erase the cache files.

    4. Update the Kik app

    Check if an update is available for Kik. You can complete this from your app store. If you can move forward with the upgrade, allow the installation to finish.

    Once you update the app, restart your mobile to refresh the connection with the latest app version.

    (Did you know; Kik has been installed over 2.5 million times from the Google Play store alone, with a 4.1 out of 5 ratings).

    Why are my messages not sending on Kik?

    Kik keeps saying connecting
    Kik keeps saying connecting

    Your messages will not send on Kik if the recipient is not connected to the internet. Your message will only get ‘delivered’ if the person you are sending the message to is in Wifi range, or on mobile data. If their Kik keeps saying connecting, it will stop your message from going through.

    Additional reasons why your messages won’t send on Kik are;

    • The Kik server is down
    • There’s been a system glitch
    • Cache files on your device are too full
    • The person has blocked you
    • Kik has been deleted

    Before you troubleshoot your device, check the Kik server status to confirm if the app is completely down. If it is, you will need to wait until the Kik technicians resolve the issue. Alternatively, you can use the following steps;

    • Restart your device
    • Remove the cache files
    • Follow up with the recipient

    The person you sent your message to may not be in an area that has adequate coverage for a network connection. When someone moves to a different location with a better signal. the status of your message will change to deliver.

    Conclusion

    We hope this guide has provided you with enough information to be able to fix your online messaging app from keep saying connecting, and that you understand why this issue has occurred, so you can prevent it from happening again in the future.

    If the problem persists, we suggest you contact Kik directly. You can submit a request where one of their team members will pick up your form and get back to you.

    (Quiz Question; how many times has Kik been downloaded from the Google Play store?).

    If you want to submit your answer to us, complete our online form. You can include any questions or feedback you may have.

  • Why does my iPad keep Displaying Zoom Enabled?

    Why does my iPad keep Displaying Zoom Enabled?

    Getting trouble with the “zoom enabled” bug and wonder “why does my iPad keep displaying zoom enabled?” Here’s all that you need to do to get the bug fixed.

    Zoom Enabled error

    Why Does My iPad Keep Displaying Zoom Enabled?

    One of the recent bugs experienced by iPad and iPhone users worldwide is the “Zoom Enabled.” The issue corresponds to a situation where the error message pops up frequently on users’ devices. 

    Although the prime reason is still to get definite, many consider the app’s poor optimization to be the principal reason behind the bug. Whatever may be the reason, the good thing is you can resolve the issue by applying some easy fixes.

    Related Posts

    Why is My Vodafone SMS Not Working

    Guide to Fix Zoom Error Code 1054

    How to Fix the “Zoom Enabled” Error that Pops-Up on iPad


    #Fix 1: Turning off the Zoom app

    settings ipad

    • Find and launch the “Settings” option and move to the “General” section.
    • Scroll down and hover over to “Accessibility” and click on that
    • Find and tap the “Zoom” option.
    • Toggle the switch to turn off Zoom operations
    • Finally, restart your device and check if the issue is resolved.

    #Fix 2: Unchecking “Zoom” from the “Reduce White Point” option

    zoom enabled error fix

    • The first thing you need to do is launch “Settings” and head over to “General.”
    • Scroll down the screen and click on the ‘Accessibility” option
    • Once done, you need to find an option called “Accessibility Shortcut” and click on that.
    • From there, click on the “Reduce White Point” option.
    • Under the menu, look if ‘Zoom” is selected or not. Make sure it is unchecked before proceeding.
    • After that, restart your device to be on the safer side.

    #Fix 3: Turning On the “Reduce White Point”

    fix zoom enabled

    • Open your device’s settings.
    • Find and tap on “Accessibility.”
    • Hover over to the “Display Accommodations” option and click on that
    • Find “Reduce White Point”
    • Toggle the switch to turn it on
    • Once done, restart your iPad.

    #Fix 4: Reset All Settings

    iPad reset settings

    • The first step is to find and launch the “Settings” option in your iPad
    • Hover over to the option that says “General” and click on that
    • Scroll down the screen and find the “Reset” option
    • Once you click on that, you will have an option to “Reset all Settings.”
    • Click on that and wait for a while
    • Next, restart your device and check if the issue is resolved.

    Note: Don’t worry; this step has nothing to do with erasing personal data. It just resets all the settings in your device to default.

    #Fix 5: Force Restart Your iPad

    factory reset to solve zoom enabled error

    To force a restart on an iPad with a home button, proceed as follows

    • Press and hold the button on the top end of your device and wait until the power-off slider appears.
    • Once it appears, drag the slider and wait for your device to turn off.
    • Now just turn your device back on by pressing and holding the top button once again until the Apple logo appears.

    To force a restart on an iPad without a home button, proceed as follows

    • Press and hold either the volume up or volume down button and the button at the top until the power-off slider appears.
    • The next thing you need to do is drag the slider and wait for your device to turn off.
    • Now, turn your device back on; press and hold the top button until the Apple logo appears.

    Final Words

    So there you have it, five easy fixes to resolve the “Zoom Enabled” message frequently popping up on your iPad. However, the best thing is, these fixes are not limited to just the iPad. The iPhone users who complain about “why does my iPhone keep displaying zoom enabled” can apply the fixes mentioned above and resolve the issue in no time.

  • Guide to Fix Call of Duty Memory Error 13-71

    Several users have reported the Call of Duty Memory Error 13-71 popping up on their computers and consoles, are you among them? Here’s a quick guide to explain the reason behind COD error 13-71 and the easiest way to resolve it right away.

    You sit down after a long day, hoping to unwind by playing some fast-paced first-person shooter with your pals online, and the game locks you out completely. Nothing could be more frustrating than seeing the Call of Duty Memory Error 13-71 pop up every time you try to play an online multiplayer, which seems to surface randomly for users out of nowhere.

    Related Posts: 

    How to Fix Call of Duty Error Code 664640

    Guide on How to Fix PS4 Error NP-36006-5

    How to Fix Call of Duty Memory Error 13-71

    By most accounts, the error 13-71 in Call of Duty does not have to do with the server issues, but the game or profile itself. Since the issue arises in the multiplayer mode when either joining a Regiment or being added to it directly, it is safe to say that the connection issue has to do with the user’s server side of things, and not the central server.

    Fix #1 – Restart the game and system

    Start things off by giving the game, as well as the console you are playing it on, a quick refresh. Simply restarting the game and the system you are running it on, will reset the connection and temporary files, which should resolve most connectivity issues instantly.

    Enable or Disable Open Xbox Game Bar using Controller in Windows 10 | Tutorials
    1. Exit Call of Duty and return to the system menu.
    2. Press the Power button and turn off the system.
    3. Now, press the Power button again to reboot the system.

    Launch Call of Duty to see if the issue has been resolved.

    Fix #2 – Log in using another account

    Several users have reported that the Memory Error on Call of Duty seems to be tied to the Xbox Live or PlayStation Plus account that you are using. A tried and tested method to resolve it is by signing out of the user account, sign in using another account and then trying to launch the online multiplayer to see if the issue has been fixed.

    Learn how to change your gamertag on an Xbox One in just a few simple steps
    1. Go back to the main menu and create a new Gamertag on your Xbox or PlayStation.
    2. Launch Call of Duty and access the game with your newly created account.
    3. Press the Xbox or PS button and switch to the old Gamertag with the one you faced the error 13-71.
    4. Before you proceed any further, use the Social menu to leave any Regiment that you are a part of.

    Relaunch the game and you should now be able to move past the error screen.

    Fix #3 – Disable Crossplay from the Settings

    Even if changing the Gamertag does not seem to resolve the Call of Duty Memory Error 13-71 for you, the last resort is to disable a setting called Crossplay, which is essential to play online in COD.

    How to Turn off Crossplay on Warzone
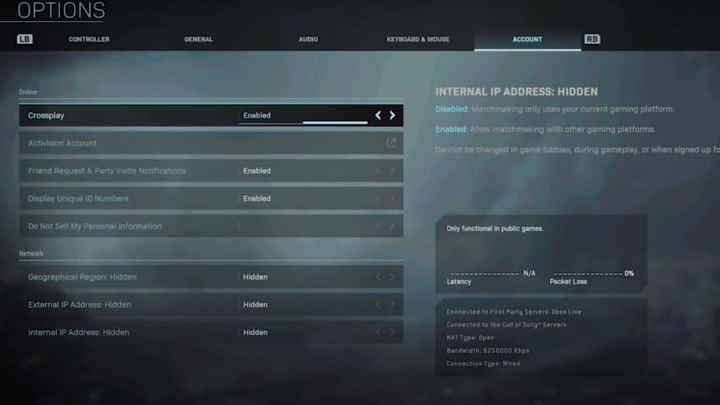
    1. Launch Call of Duty and go to offline mode when the error code appears.
    2. Head to the Account Settings and find the Crossplay feature listed there.
    3. You should Disable Crossplay from the settings and head back to the main menu.
    4. Now, launch the online mode of COD, at which point it will ask you to enable Crossplay.
    5. Go back to the previous screen and open Social menu to leave the Regiment you are a part of.

    Once you have left the Regiment, it should automatically resolve the error.

    Final Words

    The error is more common among Xbox and PlayStation users who try connecting to the online servers, but fail to do so. The only option provided is to launch the game in offline mode, or exit the game entirely. Based on reports from users, the error pops up due to the Regiments, which is a feature that allows creating clans within the online version of Call of Duty. Do let us know which of the fixes above seemed to work best for you.

  • Guide to Fix Call of Duty Memory Error 13-71

    Several users have reported the Call of Duty Memory Error 13-71 popping up on their computers and consoles, are you among them? Here’s a quick guide to explain the reason behind COD error 13-71 and the easiest way to resolve it right away.

    You sit down after a long day, hoping to unwind by playing some fast-paced first-person shooter with your pals online, and the game locks you out completely. Nothing could be more frustrating than seeing the Call of Duty Memory Error 13-71 pop up every time you try to play an online multiplayer, which seems to surface randomly for users out of nowhere.

    Related Posts: 

    How to Fix Call of Duty Error Code 664640

    Guide on How to Fix PS4 Error NP-36006-5

    How to Fix Call of Duty Memory Error 13-71

    By most accounts, the error 13-71 in Call of Duty does not have to do with the server issues, but the game or profile itself. Since the issue arises in the multiplayer mode when either joining a Regiment or being added to it directly, it is safe to say that the connection issue has to do with the user’s server side of things, and not the central server.

    Fix #1 – Restart the game and system

    Start things off by giving the game, as well as the console you are playing it on, a quick refresh. Simply restarting the game and the system you are running it on, will reset the connection and temporary files, which should resolve most connectivity issues instantly.

    Enable or Disable Open Xbox Game Bar using Controller in Windows 10 | Tutorials
    1. Exit Call of Duty and return to the system menu.
    2. Press the Power button and turn off the system.
    3. Now, press the Power button again to reboot the system.

    Launch Call of Duty to see if the issue has been resolved.

    Fix #2 – Log in using another account

    Several users have reported that the Memory Error on Call of Duty seems to be tied to the Xbox Live or PlayStation Plus account that you are using. A tried and tested method to resolve it is by signing out of the user account, sign in using another account and then trying to launch the online multiplayer to see if the issue has been fixed.

    Learn how to change your gamertag on an Xbox One in just a few simple steps
    1. Go back to the main menu and create a new Gamertag on your Xbox or PlayStation.
    2. Launch Call of Duty and access the game with your newly created account.
    3. Press the Xbox or PS button and switch to the old Gamertag with the one you faced the error 13-71.
    4. Before you proceed any further, use the Social menu to leave any Regiment that you are a part of.

    Relaunch the game and you should now be able to move past the error screen.

    Fix #3 – Disable Crossplay from the Settings

    Even if changing the Gamertag does not seem to resolve the Call of Duty Memory Error 13-71 for you, the last resort is to disable a setting called Crossplay, which is essential to play online in COD.

    How to Turn off Crossplay on Warzone
    1. Launch Call of Duty and go to offline mode when the error code appears.
    2. Head to the Account Settings and find the Crossplay feature listed there.
    3. You should Disable Crossplay from the settings and head back to the main menu.
    4. Now, launch the online mode of COD, at which point it will ask you to enable Crossplay.
    5. Go back to the previous screen and open Social menu to leave the Regiment you are a part of.

    Once you have left the Regiment, it should automatically resolve the error.

    Final Words

    The error is more common among Xbox and PlayStation users who try connecting to the online servers, but fail to do so. The only option provided is to launch the game in offline mode, or exit the game entirely. Based on reports from users, the error pops up due to the Regiments, which is a feature that allows creating clans within the online version of Call of Duty. Do let us know which of the fixes above seemed to work best for you.

  • How To Fix Pokemon Home Error 800 in These Quick & Easy Steps

    Pokemon home is a cloud-based system that allows players to store and transfer Pokemon from all modern and old Pokémon games. Pokemon Home works with a variety of games, including the Nintendo Switch games Pokémon SwordPokémon ShieldPokémon: Let’s Go Pikachu!, and many more. 

    Released in Febuary 2020, Pokemon Home is compatible with both Nintendo Switch and as a mobile app. The game has proven to be a popular hit with Pokemon enthusiasts.

    Pokemon Home Error Code 800

    If you have have been playing Pokemon Home, you may have encountered the frustrating ‘Pokemon Home Error 800 message‘. This error is nothing to worry about, and a common fault that many players experience. 

    Pokemon Home Error 800 is usually a server-related fault and is caused by too many players trying to log into the server simultaneously. 

    It has been reported that some users see a variety of error messages, for instance seeing a communication error, or an error code 504 on the Nintendo Switch. However, this is still caused by the same server problem and the message you see may vary depending on the device you are logging into.

    How To Fix Pokemon Home Error 800

    Because the error is usually server-related, the best thing to do is normally wait until the servers become less overloaded. However, there are a couple of things you can still try in the meantime: 

    1. Uninstall and reinstall – Sometimes uninstalling and reinstalling the game can help resolve this issue. 
    2. Contact Support – If the problem persists, you can contact the official Pokemon Support team here. 

    Typically we recommend waiting at least a few hours before contacting support, as by then the servers have usually rebooted and are running successfully again.

    We hope this diagnostic guide has helped you. If you have any questions, please leave a comment and we will try to get back to you as soon as possible.

  • Simple Solutions to Fix Missing String Table Entry in Valorant

    Simple Solutions to Fix Missing String Table Entry in Valorant

    Confused about how to fix the “missing string table entry” valorant error? This article will help you with exactly that

    missing string table entry valorant

    The recently launched multiplayer first-person shooter game, Valorant, has already gained considerable popularity worldwide. But besides providing players with intriguing gameplay, this free-to-play game has also been in talks for various bugs and errors. The missing string table entry is one of the many.

    If you are someone who has been experiencing the same, then the good news is you don’t need to worry much. According to many players, some basic fixes can help resolve the “missing string table entry” error easily. With that being said, let us look at the steps that you can start applying once you find yourself troubling with the same issue.

    Related Posts:

    How to Fix the Missing String Table Entry Valorant Error

    Fix #1: Logging yourself out of the game

    login to fix valorant missing string table entry

    The very basic thing that you can do to solve the “missing string table entry” is to log out of your game and then log in again.

    • While you are on the Main Menu of the game, hover over to the left side, you will find an option called “Log Out” Click on that.
    • After that, restart the game. 
    • Once the main screen appears, log in to your account using the required credentials.

    Fix #2: Restarting Your Device

    restart to fix missing string table entry valorant

    If logging in and out from your game didn’t help resolve the “missing string table entry” error, the next thing you can do is get your device restarted.

    • Hit the escape button on your keyboard or the main menu button on your controller.
    • From the main menu, hit the exit option to quit the game entirely
    • Once done, restart your device
    • After your device boots up, launch the Valorant game to see if the error is resolved

    Fix #3: Visiting Some Top-Notch Gaming Forums

    visit forums to fix missing strings table entry

    Suppose you still face the “missing string table entry” error even after doing all the resetting. In that case, you can visit various trusted game forums and look for the discussions that other players are having about the error. We recommend you specifically visit the forums that are built around the Valorant game. 

    After visiting any of the relevant forums, you can simply ask other players about the issue and learn if they implemented any special method that helped them resolve the “missing string table entry” error.

    Fix #4: Getting in Touch with the Support Team

    Are you still upset, considering the fact that none of the methods mentioned above helped you get your game back? Well, then the last thing that you are left to do is contact the Valorant team. 

    • Visit Valorant or Riot Support on Twitter and leave them a message highlighting the issue you are facing.
    • Alternatively, you can also visit the official website of Riot Games and seek help from the support team there.

    Final Words

    The prime reason behind players facing the “missing string table entry” error in Valorant being still unknown, we can expect the developer Riot Games to come up with a full-fledged solution to this real soon. Although the scenes of getting an official update on this are still indefinite, the steps mentioned above can come in real handy for resolving the error and getting your game back on track.

  • How to Fix COD Modern Warfare Error Code 65538

    Are you encountering the Call of Duty: Modern Warfare error code 65538 and can’t seem to get past it? Here’s a definitive guide that explains why the issue arises and what you can do to effortlessly resolve it.

    Ever since gaming became a mainstream means of entertainment, there have been certain games that have set the standard for the industry. One such standard has been set by Activision’s Call of Duty franchise, creating a vivid and realistic FPS (first-person shooter) gaming experience.

    The latest addition to the series has been Call of Duty: Modern Warfare, which is available across Xbox One, Microsoft Windows, and PlayStation 4. While the critically acclaimed game has received stellar reviews online, the multiplayer gaming community has reported some issues with it, one of them being the COD Modern Warfare error code 65538.

    More: 

    What does the Modern Warfare error code mean?

    Based on the gaming community forums for COD Modern Warfare, it seems that the error code 65538 pops up for users during the online multiplayer mode. Users report that the issue most commonly surfaces when trying to look for matches online, which results in a disconnection message popping up on the screen.

    Some of the most common connectivity issues that could lead to the error code 65538 to show up during the gameplay are as follows:

    • Unstable internet connection on the PC or gaming console.
    • The device set up on an incorrect time zone or region.
    • Latest updates of Call of Duty: Modern Warfare isn’t installed.
    • General maintenance issues with the Activision game network servers.

    How to fix COD Modern Warfare error code 65538

    Since this specific error is related to general network connectivity, a universal fix may not be able to fix it all. We’ve highlighted some quick and easy solutions that you can try out one by one to see if either of them helps you get past the error screen.

    Check the internet connection

    While this may seem like a no-brainer, but an abrupt disconnection from the World Wide Web can lead to failure and return the error. The easiest way to resolve this is by making sure that the computer or the gaming console is connected to the internet.

    1. When connected to a wireless network, use another device to see if the issue is actually with the network or not.
    2. Exit the game, reconnect to the network and check to see if it resolves the issue.
    3. Reboot the device and connect the system to the internet once again and see if it fixes things.

    Set the correct region on the device

    Since the game servers connect users based on region, having the wrong region set on your device can cause conflict during connection. Here’s how you can do it on the Microsoft Xbox One console.

    1. Turn on and sign in to your Xbox One console.
    2. Press the Xbox icon and head over to the Settings
    3. Navigate to All Setting – System – Language & location
    4. Select your region from the list and then Restart button to reboot the console.

    On the PlayStation and Microsoft Windows, you don’t have the ability to change the region if you’ve already created the account. If you have been using a VPN service with the gaming console or have it set up on the wireless router, it may be the direct reason behind the Modern Warfare error code 65538.

    Final Words

    Apart from the issues mentioned above, there could also be issues with the game servers of Activision. In case none of the solutions mentioned above doesn’t seem to work out for you, and the error code has not been persistent, your best bet is to just wait it out and check to see if the issue fixes itself after a few hours.

    Were you able to fix this annoying issue that has been disturbing your intense gaming session with the squad on COD Modern Warfare? Be sure to share your thoughts in the comments section below.

  • How to Delete McAfee from Mac

    Tired of the McAfee antivirus repeatedly pestering you with notifications and pop-ups on the side? Here’s how you can delete McAfee from the Mac OS system the easy way.

    For as long as computers have existed, so has been corrupted software that lands viruses and malware on to them. While Windows and Linux have been plagued by all sorts of adware, malware, trojans, and viruses, Apple has kept macOS X fairly safer in comparison. The company was able to do so by creating a closed ecosystem and controlling every aspect of the operating system, which continues to do to this day.

    Related Posts: 

    However, this does exempt macOS X from viruses, which is why third-party antivirus software developers also extend their services to Mac users. Over the years, antivirus software providers have increasingly become intrusive, which not only download other add-on services automatically but also ruin the user experience with unsolicited pop-ups and notifications. At times, McAfee has also been accused of such deeds, which is why you would want to know how to delete McAfee from Mac machines.

    Method 1 – Remove McAfee from macOS using the Finder

    The first and most straightforward way to uninstall McAfee antivirus from the macOS X system is just how you would uninstall any other app.

    How to Uninstall McAfee
    1. Close any other program that is running on your macOS computer.
    2. In the Dock bar, click on the Applications menu.
    3. Scroll down to find the McAfee Internet Security Uninstaller and click on it.
    4. Click on Continue and enter the administrator password to confirm your action.
    5. The uninstallation process will now begin, and you can press Finish after the process is completed.

    Method 2 – Delete McAfee from Mac with Terminal

    While using the Applications menu helps you remove most apps, McAfee tends to leave behind apps and files even after uninstalling the main module. A rather expert method to completely remove McAfee from your computer is using the Terminal window with the following steps:

    1. Launch the Spotlight tool and search to open a Terminal window.
    2. In the Terminal window, type in the following line of code:
      sudo /Library/McAfee/cma/scripts/uninstall.sh
    3. Hit the Enter button and then type in the administrator password into the window.
    4. Follow the on-screen instructions to delete McAfee from Mac computer once and for all.

    Finally, reboot the macOS computer, and you will have finally removed from the Mac computer for good.

    Method 3 – Manually Delete McAfee System Files

    One final method to get rid of McAfee software from macOS X computers for good is to select each and every app file and delete it.

    Take Correct Steps to Uninstall McAfee for Mac | WordCamp Mid-Atlantic
    1. Launch the Finder app and click on Go to and select Go to Folder from the drop-down menu.
    2. Search in the following directories for McAfee-related files and delete all of them:
      /Library/Preferences/
      /Library/Application Support/
      /Library/Caches/
    3. Now, open the Trash app and click on Secure Empty Trash so that you remove all of the files stores there.

    Final Words

    The way McAfee has designed the antivirus software, allows add-ons to operate separately from the central service. While the first method may work well on removing the add-ons, you may need to use the more advanced solutions to remove every trace of the antivirus software from the macOS X system.